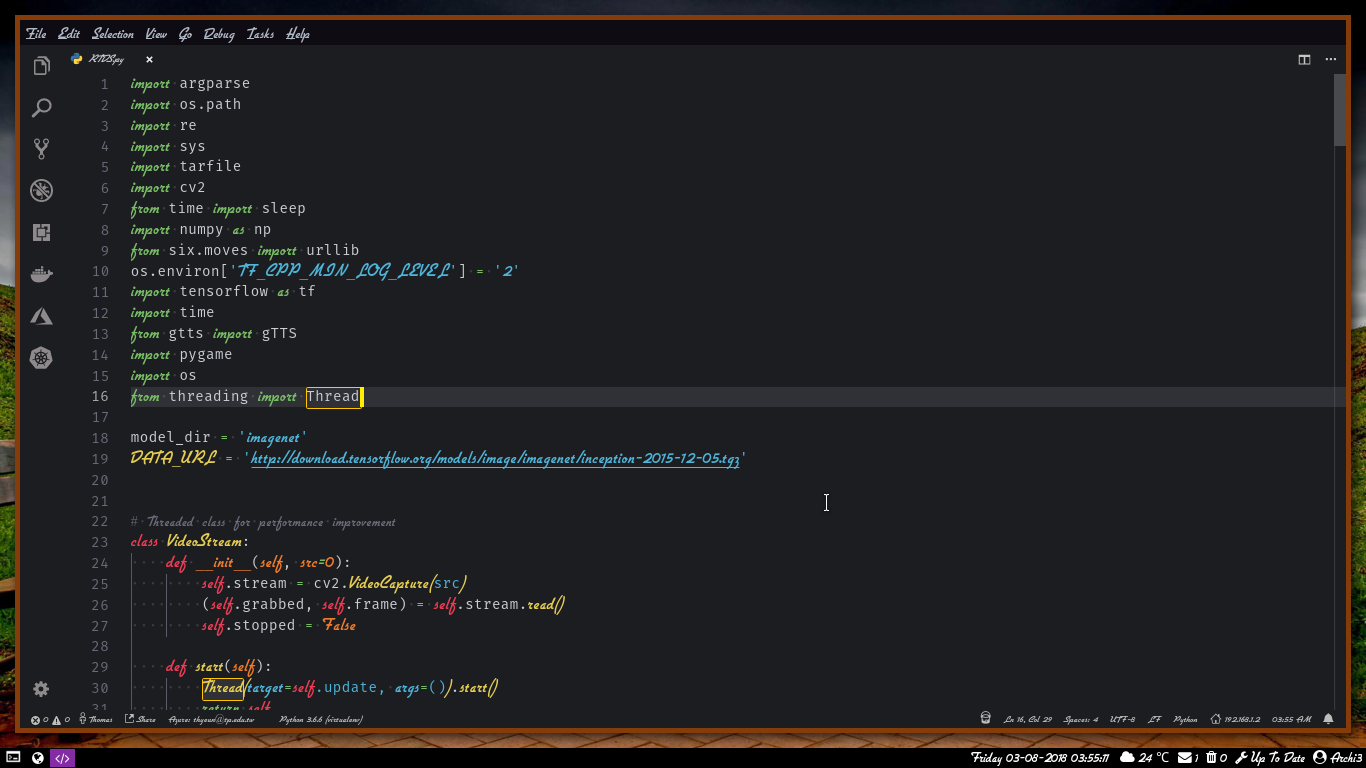
Visual Studio Code Configuration - Part 1
Been using from Neo vim to Atom Editor to Visual Studio Code, several years of using vim and Nvim, and several years of using Atom Editor. Finally end up using Visual Studio Code (aka VS code) for all coding ( C/C++, Python, C#, JS and static blog generator ).
Everyone have his/her own configuration/setting when come to Editor or IDE. After two years of using Visual Studio Code, with abit tweaking here and there, there are some of the configuration/setting that need to be sharing out with all Visual Studio Code user.
In this post, will sharing out the configuration/setting that been accompany me during this two years of using Visual Studio Code. For the part 1, will focus on User Setting and Custom css ( aka style css ).
First things first, to complete the User Setting, need an extra extension to be install and need abit of tweaking.
An extension that needed is Custom CSS and JS from be5invis.
By follow the instruction page from be5invis, it is easily to finish up the installation and tweaking step.
Below are the User Setting that accompany me during this two years. By make change of the file setting.json.
{
    "workbench.startupEditor": "newUntitledFile",
    "editor.minimap.enabled": false,
    "jupyter.appendResults": true,
    "window.zoomLevel": -1,
    "terminal.integrated.fontSize": 11,
    "window.menuBarVisibility": "toggle",
    "workbench.activityBar.visible": true,
    "workbench.sideBar.location": "left",
    "workbench.colorTheme": "An Old Hope",
    "editor.fontSize": 17,
    "editor.lineHeight": 25,
    "editor.letterSpacing": 0.5,
    "files.trimTrailingWhitespace": true,
    "editor.fontWeight": "400",
    "prettier.eslintIntegration": true,
    "editor.cursorStyle": "line",
    "editor.cursorWidth": 5,
    "editor.cursorBlinking": "solid",
    // Very important: Install this plugin: https://github.com/be5invis/vscode-custom-css
    // you'll need to change this to an absolute path on your computer
    "vscode_custom_css.imports": [
      "file:///home/thyeun/.vscodestyles.css"
    ],
    "editor.renderWhitespace": "all",
    "workbench.iconTheme": "vscode-icons",
    "editor.fontLigatures": true,
    "editor.fontFamily": "Fira Code",
    "explorer.openEditors.visible": 0,
    "terminal.integrated.rendererType": "dom",
    "npm.enableScriptExplorer": true,
    "git.autofetch": true,
    "workbench.colorCustomizations": {
      "editorCursor.foreground": "#ffee00",
      "statusBar.foreground": "#bdbdba",
      "activityBar.foreground": "#dad3d3"
  },
  "workbench.statusBar.feedback.visible": false,
  "team.showWelcomeMessage": false,
}
Once finish up configuration/setting on User Setting ( setting.json ). Go on with tweaking Custom css. By using Custom css, it is possible to using multi-font on Visual Studio Code. With multi-font Fira Code and flottflott, you will see the magic of Visual Studio Code theme.
Before you paste the below configuration/setting into your Custom css (aka style css ) file, you need create a file on your system. Here is the path and the file name on my system, home/thyeun/.vscodestyles.css.
Here goes the code for Custom css (aka style css ).
.monaco-shell {
  font-family: 'flottflott';
}

.mtki,
.mtk4,
.mtk6,
.mtk7,
.mtk13,
.mtk15 {
  font-family: "flottflott";
  font-size: 1.2em;
  font-style: normal;
}

.mtk5,
.mtk16 {
  font-family: "flottflott";
  font-size: 1em;
  font-style: normal;
}

/* This makes the dirty tab circle yellow */
.vs-dark
  .monaco-workbench
  > .part.editor
  > .content
  > .one-editor-silo
  > .container
  > .title
  .tabs-container
  > .tab.dirty
  .close-editor-action {
  background: url("data:image/svg+xml;charset=utf-8,%3Csvg xmlns='http://www.w3.org/2000/svg' viewBox='0 0 16 16' height='16' width='16'%3E%3Ccircle fill='%23ffc600' cx='8' cy='8' r='4'/%3E%3C/svg%3E")
    50% no-repeat;
}

.monaco-workbench > .editor > .content > .one-editor-silo {
  border-top: 1px solid #15232d !important;
}

.one-editor-silo + .one-editor-silo {
  border-left: 1px solid #15232d !important;
}

/*
  This puts a thin yellow border around the found items like Sublime did it
*/
.monaco-editor .findMatch,
.monaco-editor .selectionHighlight {
  border: 1px solid #ffc600;
  border-radius: 2px;
  background: transparent;
}

/* This accounts for larger font cutting off - bump up 3px */
.monaco-workbench>.activitybar>.content .monaco-action-bar .badge .badge-content {
  top: 17px !important;
}
Lastly, using theme An Old Hope Theme, is the best for the above configuration/setting.
